


Getting back to the vehicle after a long peak-bagging climb typically leaves me feeling elated with a sense of accomplishment. With Little Bear Peak, that wasn't the case. Upon finding my vehicle after nearly half a day and my riskiest mountain experience thus far, I felt emotionally spent. I wanted to feel excitement and thankfulness that I had survived the daunting and dangerous climb to the summit of the mountain, but I mostly felt a sense of guilt stemming from how easily I was able toss the instinctual motive of self-preservation aside to scale the notorious route.
Editor's Note: Originally published in July 2021.
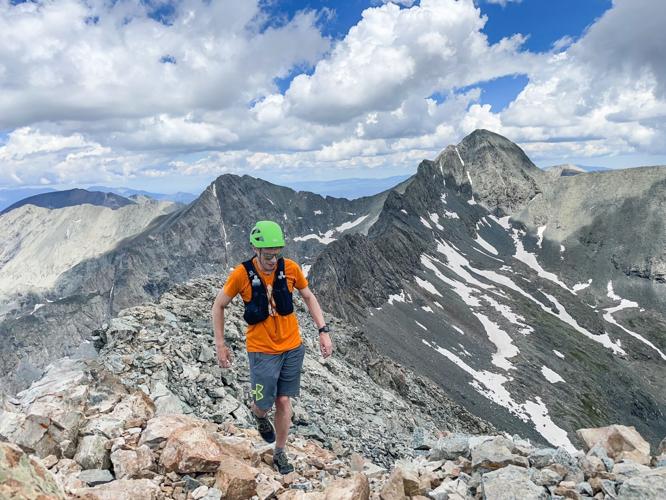
Little Bear Peak is found in Colorado's Sangre de Cristo mountain range, towering above the San Luis Valley at a height of 14,037 feet. Jagged ridges reach out from the summit, with any route to the top being quite treacherous and reserved only for experienced climbers. The least technical route to the top is still quite technical, with a crux that means scaling around 800 feet of near-vertical terrain in a narrow gully that acts as a funnel for rocks falling from above, tackled by most without any sort of rope or protection aside from a helmet.
Summiting the peak is a daunting task, indeed.

Little Bear Peak above Lake Como. Note: This person put their tent way too close to the water. Per recommendations from Leave No Trace, camp at least 200 feet from lakes and streams. Photo Credit: Spencer McKee.
Even the route to the trailhead of Little Bear Peak is threatening – one of the roughest four-wheel-drive roads in Colorado with a number of features capable of tossing seasoned backroad travelers off of a steep edge.
Author's Note: Little Bear Peak is a very dangerous peak to summit. I do not recommend that you climb it, regardless of skill level, due to the unpredictable nature of rockfall risk.
The Route
The standard southwest face route to the summit of Little Bear Peak consists of four main parts, rated as class four technically and stretching for about 14 miles with around 6,200 feet of vertical gain.
The first portion of this climb (at least for most) consists of a long walk up Lake Como Road to an elevation of 11,750 feet. This is the aforementioned four-wheel-drive road, reserved for only the burliest of vehicles. While some drivers may be able to make it up a portion of the road, most people are forced to park roughly five miles away from the namesake lake and the route up Little Bear Peak. This means a five-mile hike with 3,900 vertical feet of gain prior to any sort of actual trail. On top of that, it's not just the large obstacles along the route that make traveling this road difficult. The road itself mostly consists of fist-sized rocks – ankle-breakers that are too shifty to cover too quickly on foot.
The next portion of the hike comes shortly after Lake Como Road hits the stunning Lake Como. At this point, Little Bear Peak climbers must scale a steep gully filled with loose rock.

Photo Credit: This image shows the first true obstacle of the route – a difficult class two (maybe class three with a bad line) gully that's filled with loose rock. Photo Credit: Spencer McKee
This portion climbs about 600 feet to a notch on the ridge above. Most climbers familiar with class two and three climbing in loose terrain will find this section manageable, though route-finding can be tricky.
Once the ridgeline notch is gained, the third portion of the route is a section that comes as a relief. Climbers now traverse along the rocky side of the ridge with little vertical gain for a mile or so while on their way to the fourth and final portion of the climb – the infamous 'Hourglass.'

This image shows the traverse across the ridge, leading to the nearly vertical Hourglass feature that lies between climbers and the final push for the summit. Photo Credit: Spencer McKee
Cairns lead the way during this section, helpful for distracted climbers likely nervous about the final stretch of the route that's slowly revealing itself in the distance ahead.
Finally, the base of the 'Hourglass' is reached.
The Hourglass
The Hourglass is the reason Little Bear Peak is considered to be one of the most dangerous standard-route fourteener climbs in Colorado. Nearly vertical and stretching roughly 800 feet above the gully below, the Hourglass requires climbers to scale it in a way that the layman would recognize as technical rock climbing. To further complicate this portion of the route, there's not much of a set path to follow, forcing climbers to read the holds as they reach them, with serious consequences resulting from a mistake. Further endangering those in the Hourglass is an extremely loose field of rock that sits above the hazard. Large rocks regularly drop into the steeper terrain below, crashing down in an unpredictable manner that is a potentially fatal risk to all, regardless of experience and preparation.
Upon reaching the base of the Hourglass, I paused, committed to the climb, but cautious to pick the correct route up the rock wall.

A look up the Hourglass, including the 'support rope' mentioned below. Earlier in the day of my climb, another group had pulled off a 50-foot chunk of this notoriously sketchy rope. Using it to support weight is ill-advised. Photo Credit: Spencer McKee
A support rope dangles down the center of the Hourglass, though its integrity is oft brought into question. Most advise against using it to aid in the climb, unreliable due to constant exposure to the elements and the many times it has been tied back together over the years. I would later find out that the day's first group of climbers – one of three climbing parties on the mountain that day – had pulled off a chunk of rope that was about 50-feet-long with a tug, putting the rope's sketchy nature on display. That being said, the second climbing party – a solo climber – had told me in passing that he successfully used the rope for balance while on his descent through the section (Granted, he may have been more wary of doing so had he know that part of the rope had come off hours before).
From my point at the bottom of the Hourglass chute, I could see the rope many feet above my head. In the middle of the wall, the rope also happened to be resting in a flowing trickle of snowmelt, soaking it and the rock around it.
Knowing the rope might be unreliable and wanting to avoid potentially slick rock, I opted to start my ascent of the hourglass via a more vertical option on the left side of the chute. Slowly and surely, over the course of about an hour, I pushed up the 800 feet of rock with care. As someone who rock climbs regularly, also donning my lighter gear kit, the climbing felt relatively natural. That being said, I already found myself growing nervous about the inevitable downclimb soon to come.
Once out of the Hourglass, a little more class two climbing got me to the summit. Clouds had been building overhead for the past hour or so, though rain was unlikely. In fact, weather had been absolutely perfect with a favorable forecast ahead. I explored the area a bit and snapped a few pictures, excited that I had reached the top, but anxious about navigating a safe route down the mountain.
Eventually, I bid the summit farewell and started my walk toward the top of the Hourglass to prepare for my descent. It was then that I realized how dangerous the Hourglass really was.
Having ascended the Hourglass without anyone above me, the much-discussed risk of falling rock had yet to rear its head. And then, with one wrong step, a close call made that risk quite apparent.
As I carefully moved around the rock field above the chute, I heard a distinctive crack beneath my foot. It felt as if I had been crossing a frozen lake, only to hear a crack in the ice – both in how my step had compromised the terrain and in the way the sound made my heart skip a beat. The shelf of rocks I was on slowly started to move downslope toward a cliff a hundred feet or so away. I scampered to more solid ground, fortunately able to make it before the rocks had moved beyond the point of no return and off the edge of the cliff.
In this case, the rocks stopped moving, though their unified motion made it easy to see how momentum could result in a massive rockslide, sending a death trap into the Hourglass below.
My fears were soon confirmed on a much smaller scale when my foot kicked a rock the size of a mobile phone downslope.
I yelled out "rock" loudly several times, though I assumed the stone would stop bouncing sooner than later as had been the case on many other loose slopes I'd traveled before. But the rock didn't stop. It kept bouncing down toward the Hourglass feature, knocking one rock, then two rocks, then ten rocks loose along the way to follow its path until it disappeared beyond the angle of the slope.
I hadn't seen anyone on the mountain behind me, but my mind immediately jumped to the possibility that someone else may have made it to the gully, now put at risk due to my accidental kick.
I yelled out "rock" again as loud as I could, though at this point, the falling rocks would have been obvious to anyone in the valley.
As the rocks made their way down the Hourglass, they joined in a chorus to create the rolling sound of shattering glass for a long moment during which time seemed to stand still.
"All good?" I shouted blindly into the gully after the ear-shattering crackling had subsided. There was no response.
I continued into the Hourglass, now fully aware of what danger literally loomed. Though no one would remain above me on the steep slope to knock down a rock, even a small animal would be capable of causing a slide that could put my life at risk.
As careful as could be, I inched my way down the steep rock face, chest against the wall and open air behind me. As I approached the steepest part of the gully, pursuit of the safest downclimbing holds pushed me toward the middle of the chute – where the rope was, as well as the trickling water. Even with the moisture, this path seemed to be the better call.
Entering the crux of the downclimb, I was met with a difficult question – how much can I trust the rope? I knew I couldn't use the rope for any sort of a rappel, but what about as a balancing aid?

Looking into the steeper section of the Hourglass, where visibility of what lies below is quite limited. Photo Credit: Spencer McKee.
I found a spot where I was fully secure and protected from any rock I might knock loose and I gave the rope a hard tug. It had the typical dynamic stretch to it like most climbing ropes do, but seemed securely anchored to the wall. I gave it another tug to the same result.
My judgment was that it was not trustworthy enough to rely on, but perhaps secure enough to hold in a pinch – if nothing else, but for the slim chance it could save my life following a very possible slip on the wet rock. I straddled the rope and continued to work my way down the hourglass with careful placement of my hands and feet. It was the type of route that probably took about twice as long climbing down compared to climbing up. For the entire downclimb, I stayed extremely attentive to the noises coming from above, ready to seek cover at a moment's notice.
Eventually, the results of my careful downward struggle came to fruition and I was at the bottom of the gully, looking up in disbelief of what I had ascended and subsequently descended over the past few hours.
Exhausted from a long-lasting pull on my adrenaline and in a mind haze, I made my way back across the ridge and down to Lake Como with relative ease, soon tacking on five more miles as I safely made my way back to my vehicle.
In Conclusion
Overall, I found that the route to the Little Bear Peak summit lived up to the hype. It's difficult and dangerous and should be reserved for only experienced climbers that are also comfortable with significant risk and exposure.
On a quest to climb all of Colorado's 58 14,000-foot peaks – 59 if you count Sunlight Spire, which I think I do – I'm glad I summited Little Bear. Would I recommend this peak to most? No. This is because it's not just the technical nature of the route that makes this climb so formidable, but the unpredictable nature of rockfall risk. I probably won't be taking my chances on this peak again any time soon and if I'm ever back up there, I'll be opting to travel to nearby Blanca Peak via a class five ridge traverse, downclimbing from there versus downclimbing the Hourglass. I'm very thankful I'll probably never have to do that downclimb again.
Author's Note: Little Bear Peak is a very dangerous peak to summit and I don't recommend that you climb it. Regardless of skill level, the rockfall risk present in the hourglass presents a very dangerous situation that could easily kill. Any time you're on a dangerous backcountry climb, it's crucial to maintain connectivity with people that have your back. I use a Garmin inReach, which tracks my position in real time and allows for text communication with others without having to rely on cell service. I use this on every fourteener climb or rock climbing outing and recommend you consider using the same device or something similar for the safety of yourself and others. Outdoor recreation has inherent risk and different people have different levels of risk tolerance. That being said, if and when something goes wrong, having a means of reaching out is key to expediting a response.


(1) comment
Good article, Spencer. Thanks for sharing your experience.
Welcome to the discussion.
Log In
Keep it Clean. Please avoid obscene, vulgar, lewd, racist or sexually-oriented language.
PLEASE TURN OFF YOUR CAPS LOCK.
Don't Threaten. Threats of harming another person will not be tolerated.
Be Truthful. Don't knowingly lie about anyone or anything.
Be Nice. No racism, sexism or any sort of -ism that is degrading to another person.
Be Proactive. Use the 'Report' link on each comment to let us know of abusive posts.
Share with Us. We'd love to hear eyewitness accounts, the history behind an article.